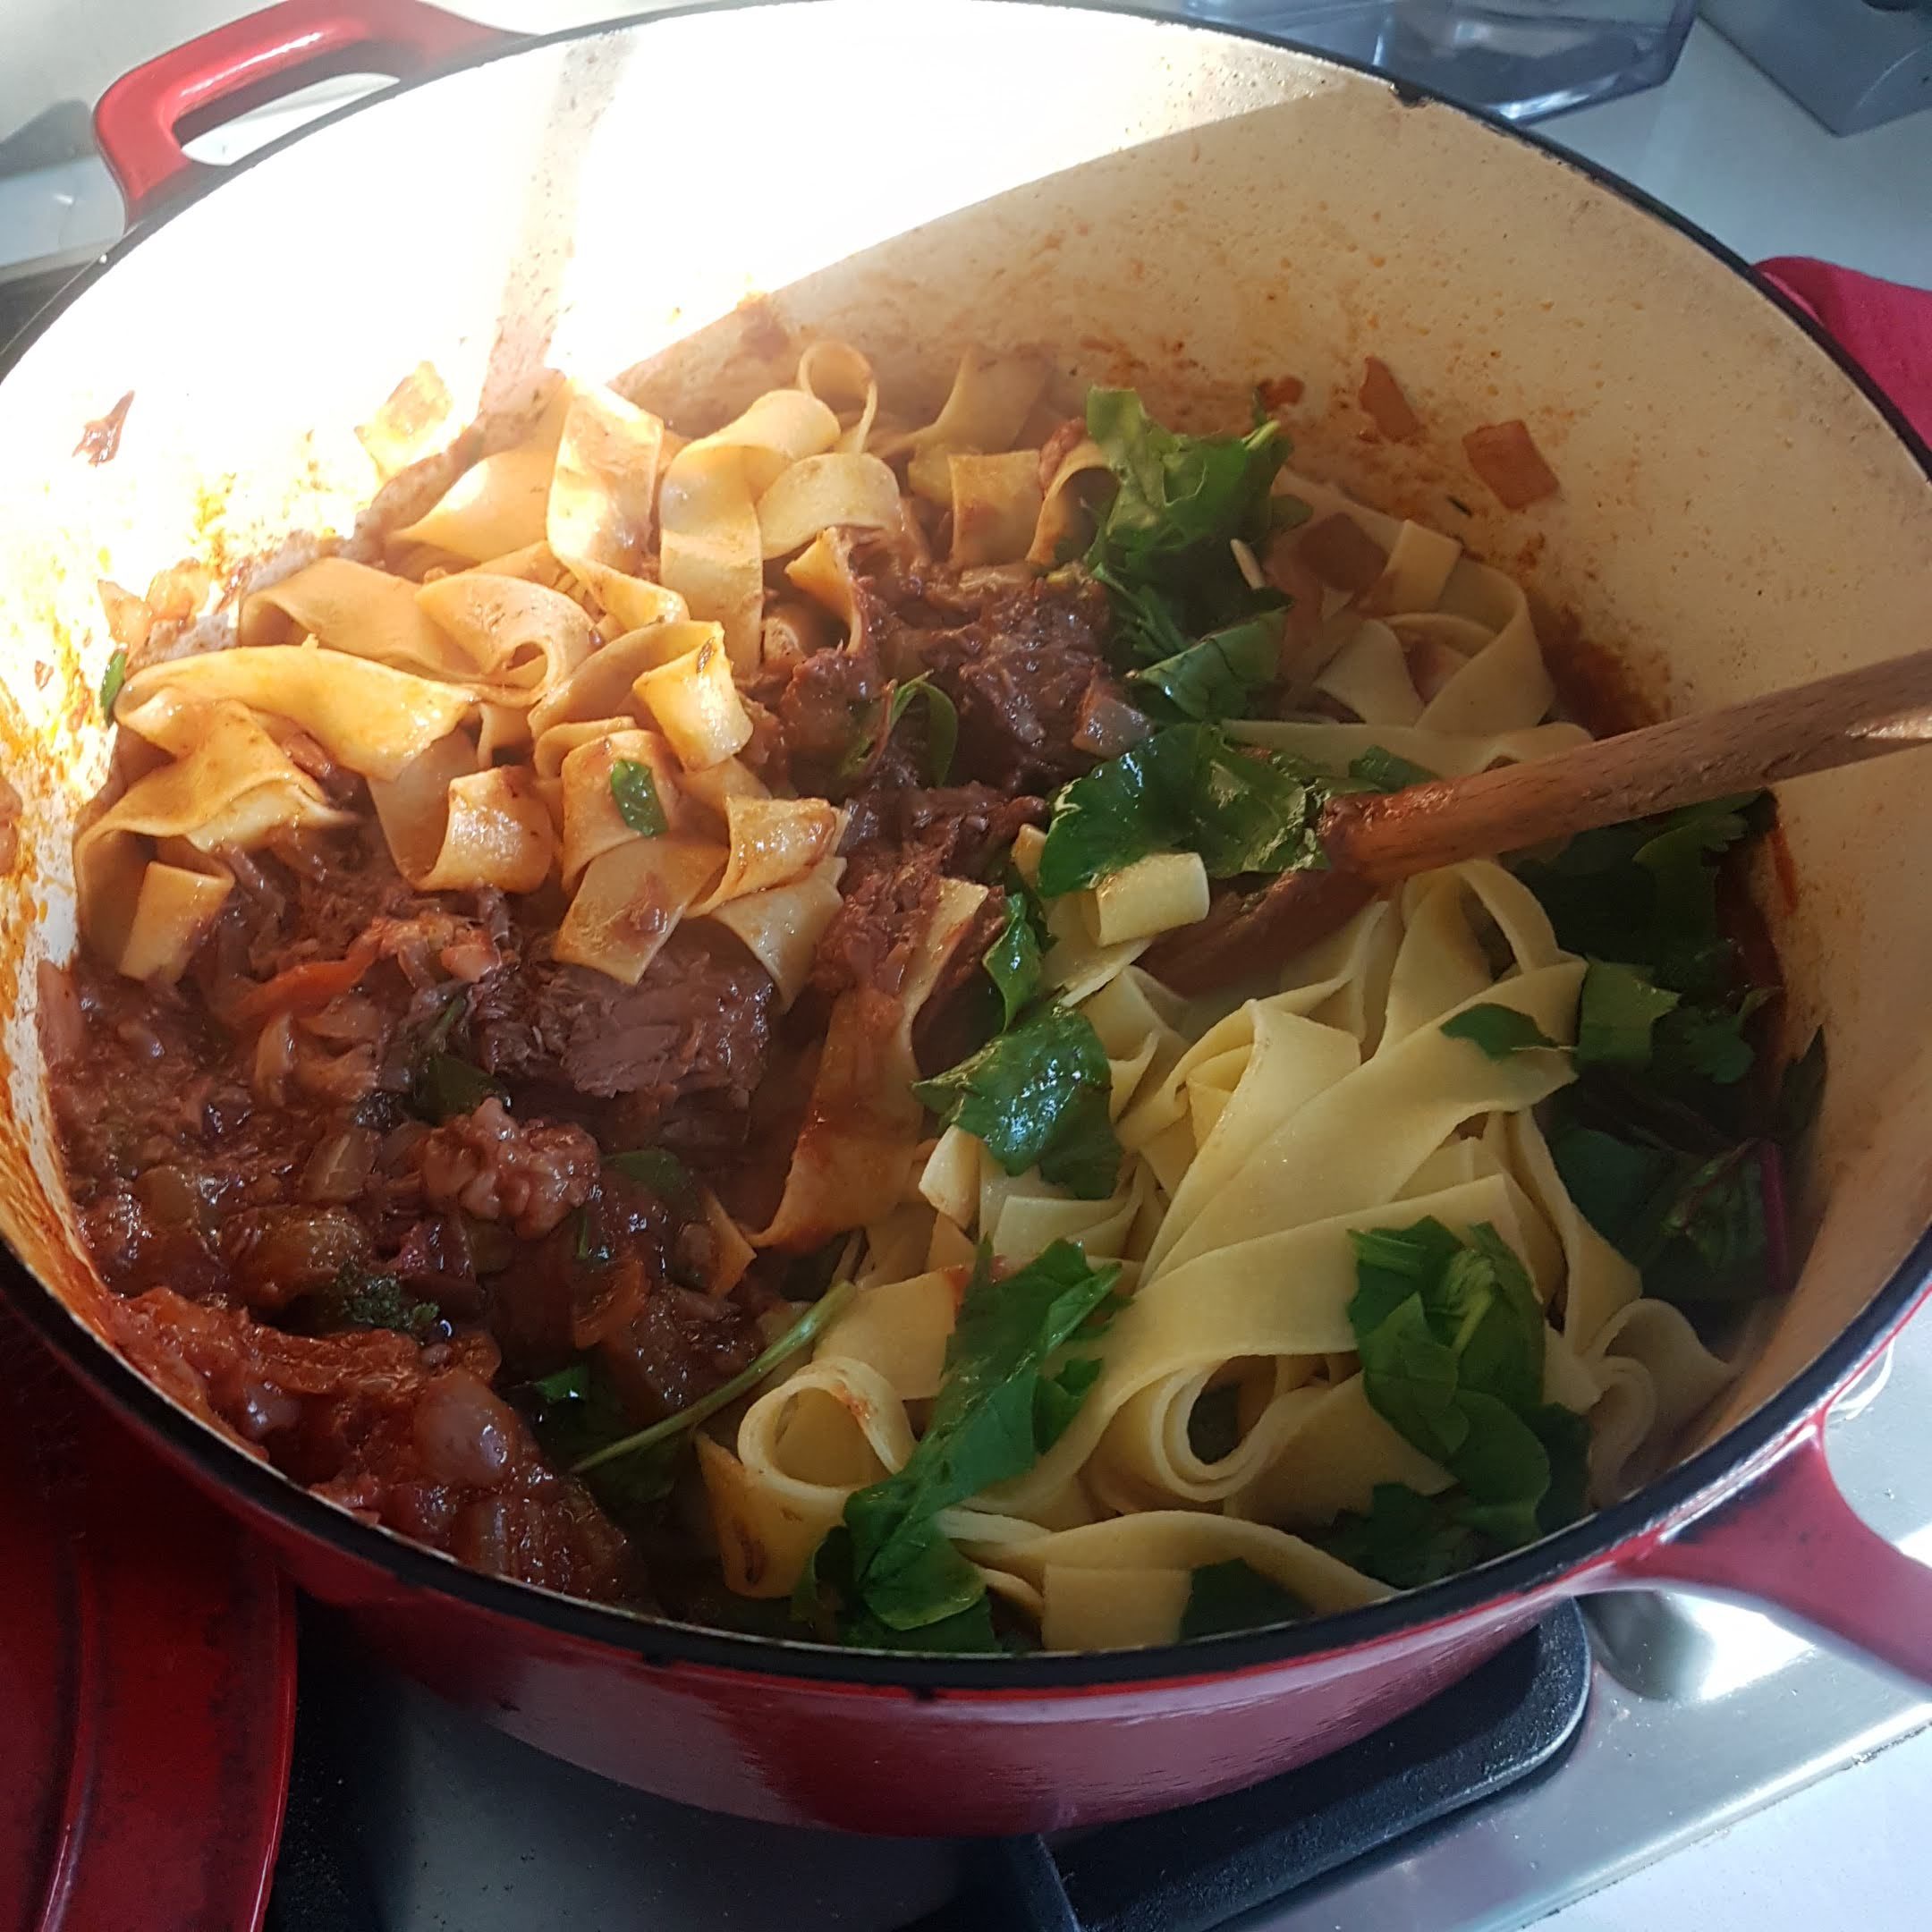
Beef ragu

I’m reluctant to say how many this serves, as it completely depends how hungry everyone is, and it is quite moreish! But tonight it is feeding 2 adults and 2 children under 8 and we’ll have leftovers for lunch or dinner tomorrow with a salad on the side. If I was famished I could eat 3 bowls, so if you have teenage children or 4 adults I think it would do for one meal.

This is one of those chuck everything in the pot and let it do it’s thing for a few hours. It can then sit for a while until you’re ready to serve dinner when you can quickly cook the pasta and toss everything together. You could even make it a day or two in advance.

1 tablespoon olive oil

1kg beef chuck steak, patted dry with paper towel

1 brown onion, chopped

3 stalks celery, sliced

1 cup red wine

400ml passata (Mutti)

3 cloves garlic (whole, unpeeled)

1 bay leaf

2 sprigs thyme 

Pappardelle, broccoli florets, spinach/beetroot leaves, parsley

Parmigiano reggiano, finely grated, to serve


  1. Heat a heavy casserole with a lid. Add oil, add beef, no need to chop it, mine was in 2 large pieces. Leave it to brown, don’t move it around. Turn it after a minute or 2 after it has developed some colour.
  2. Add onion and celery and then wine, allow to bubble up for 30 seconds, add passata and fill jar with water, shake and add that too. Add garlic, bay and thyme, some black pepper and a little salt.
  3. Cover and cook on the stovetop on lowest heat for 2.5 hours until falling apart when prodded with a spoon. Check a few times to make sure it’s not sticking to the bottom. Add a little water if needed, but not much, it’s nice when the sauce thickens. Gently shred meat in the pan.
  4. Cook pasta in boiling salted water (1-2 tsp sea salt), drain, retaining a few tablespoons pasta water. Add broccoli in last minute of cooking time.
  5. Add drained pasta to ragu with leaves and parsley, check seasoning. Serve with reggiano

I’ve been reading a wonderful recipe book cover to cover, drinking it in and absorbing the culinary and social ideals of Hana Assifiri. It’s called Moroccan Soup Bar and contains the recipes from a restaurant in Melbourne that is adored by its many and varied patrons. The customer reviews scrawled on napkins and sprinkled throughout the book give great insight into the impact the restaurant has on the community. Hana has built a special space, a warm and inviting community for people to feel at home, or to feel something new, and have their mind opened to new ideas, but in a very nurturing and loving way, with humour, acceptance, spark.

The recipes are simple and I can tell just from reading them they will be delicious. I borrowed my copy from a neighbour who handled it with such care and stroked the pages so lovingly as she spoke of Hana I accepted the offer to borrow it for a few days with a promise to return it shortly. It didn’t take me long to decide I needed to own my own copy as I could tell this book would end up being pulled out often, and actually used and it is hard to keep something precious like that clean in a house with small children.

So this dish is not a recipe from the book, but a delicious meal nonetheless inspired by Hana and her food philosophy: celebrating vegetables and the many different textures that can be achieved through different cooking methods, with gentle spicing and layering of flavour.

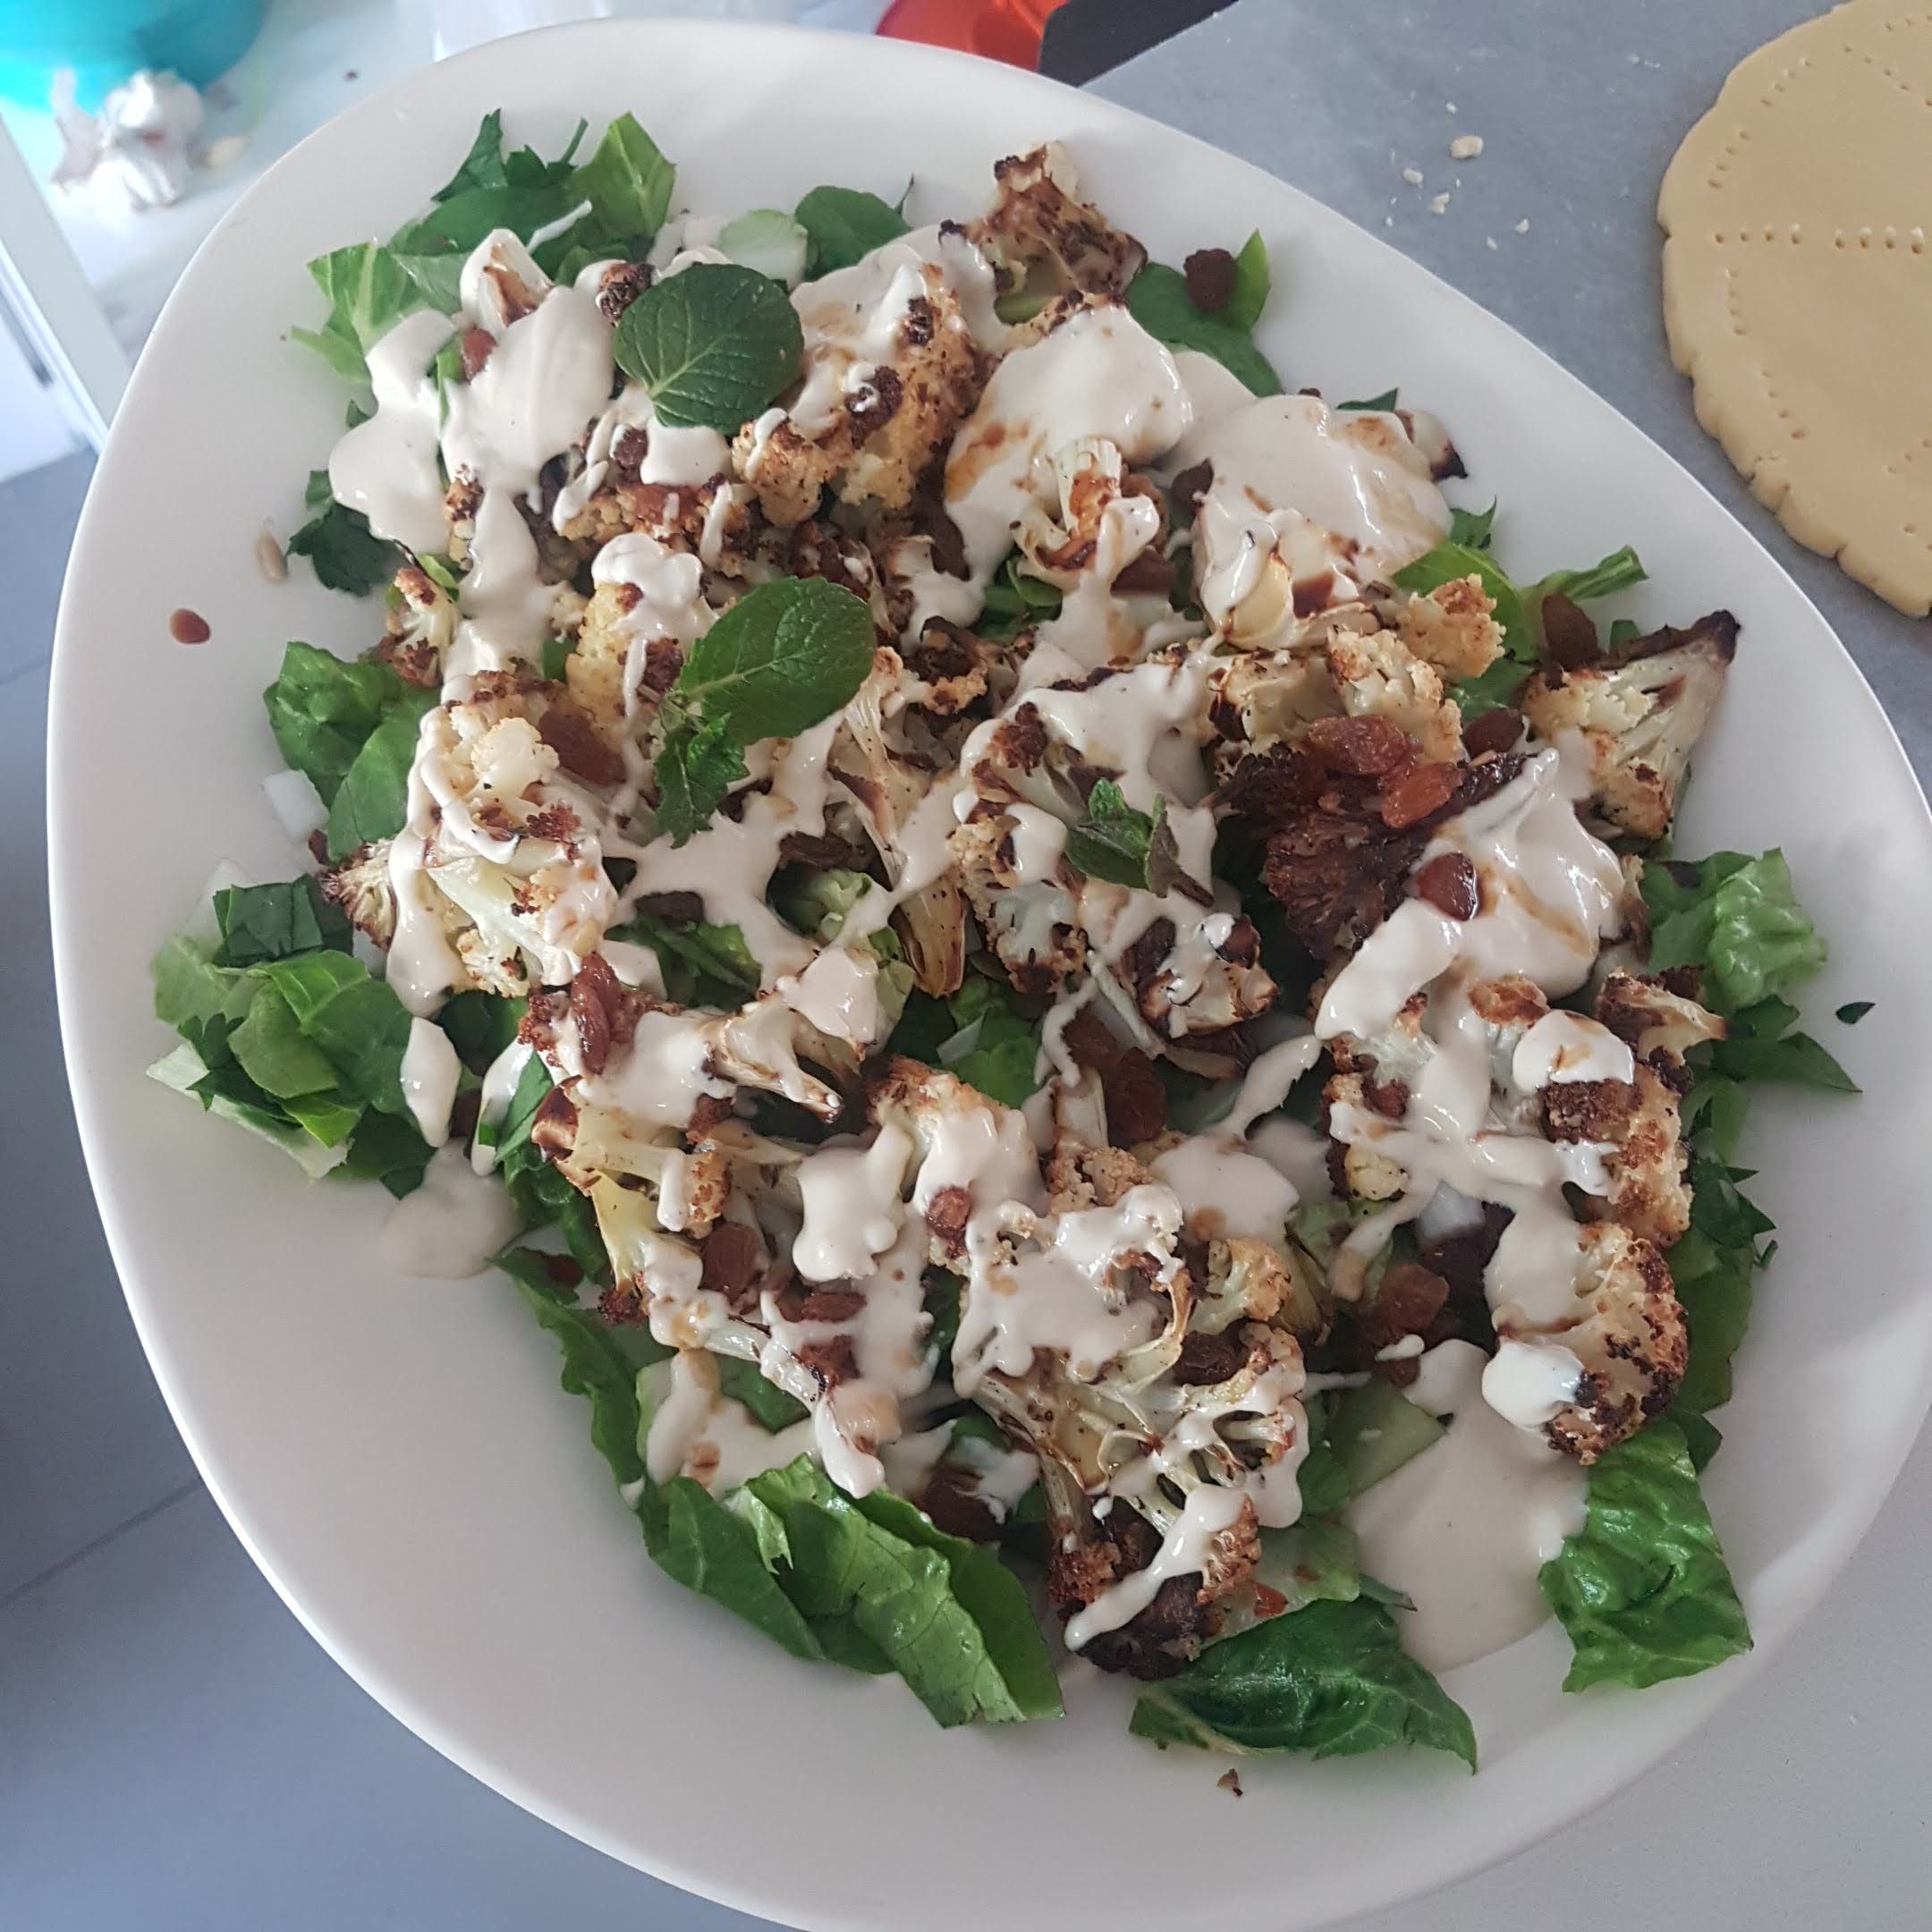
Roasted cauliflower with cumin and chilli and a tahini dressing

1/2 head cauliflower, cut into florets

1 tablespoon olive oil

1 tsp chilli flakes

1 tsp cumin seeds

Tahini dressing

3 tbsp Tahini

1-2 tbsp lemon juice

1 clove garlic

water


1 cos lettuce, leaves washed and shaken dry, chopped

2 tablespoons sultanas

2 stalks celery, sliced

1 tablespoon vinocotto, to drizzle


  1. Preheat oven to 220C. Place cauliflower in a bowl with oil, salt, pepper, chill and cumin and toss to coat, spread over baking tray and roast for about 30 minutes or until very dark golden. the timing will vary on how hot your oven is and how small you cut the florets, shake the tray and cook until they have lots of colour. This gives flavour.
  2. Whisk tahini with lemon, garlic, salt and pepper and a few tablespoons water. It will thicken as you whisk. Whisk until smooth and adjust taste for seasoning and desired lemon. Add a little olive oil if desired. Thin with extra water if needed to drizzling consistency.
  3. Spread lettuce and celery over a large tray, top with cauliflower, then sprinkle with sultanas, drizzle with tahini dressing and then vinocotto to finish.

Tips: Cauliflower can be roasted ahead of time, but make sure to serve the cauliflower at room temperature or warm. Reheat in oven if required.


Today’s cake is inspired by Israeli food blogger Keren Agam https://www.instagram.com/keren_agam/?hl=en who I discovered through my lovely friend Hagar who has been spoiling us with Rugelach and Challah and all manner of baked treats. If you want the English version of her recipes (and you will) go to her blog using Chrome and click translate. I added a little lemon juice/icing sugar drizzle after baking to add a bit more punch.

What is it about making cake that is therapeutic? 

One part nostalgia- there is something about the sense of smell that is one of our earliest and deepest memories. It is connected to our long term memory in ways we are not even conscious of. One of my favourite food memories is my mum making Chicken Everest by Charmaine Solomon, a roast chicken, covered in spices, fragrant yet delicate, cooked in a bag to contain the juices and keep it moist. I used to request it all the time.

My grandmother was also a fan of Charmaine Solomon, and I was surprised to discover that my grandmother’s famous Christmas cake recipe was actually from the pages of a Charmaine Solomon classic tome, first published in 1976, The Complete Asian Cookbook. Rich with eggs, spices, almonds, semolina and fruit, sticky with ginger, lemon zest, rosewater…truly delicious and unrelated to a dry fruitcake studded with sultanas alone.

One part scientist- whether it is the fascination of watching bicarb fizz in water, or a yeast mixture rise and turn bubbly or a cake grow and set in the oven, there is something exciting about watching and smelling these changes in the kitchen.

I’m often amazed when making a cake that one minute the kitchen will smell of nothing much, then the next it will smell slightly sweet and ‘cooked’ a little caramelised but in a good way, this is often when I know the cake is done, even if the timer hasn’t gone off yet. if you leave it to go longer (maybe you’re in the shower etc and don’t notice the smell) it will start to smell like a darker caramel and eventually burn (ask me how I know). As well as the colour of the cake and the time recommended it’s good to keep a nose out for this change in smell too.

Many people don’t realise most baking recipes are not written for a fan-forced oven so if you don’t have a non-fan setting (which is my preference for baking as it is more gentle and even) you should drop the temperature by 10-20C from say 180C to 170C. Using an oven thermometer would save many a cake from being dry and overcooked as some ovens run very hot.

One part greedy glutton- I’m just talking about myself here ok? One of the main joys of being able to make something at home is to have something fresh, warm, straight out of the oven, and exactly what you were craving- it is such a pleasure.

One part superfairy- there is something about being able to make something special for someone who you know will enjoy it and know it will make them feel appreciated and looked after. It doesn’t have to be sweet either, some of my favourite food gifts have been salty sour pickles to be eaten alongside a curry or a bag of lemons to be turned into lemon curd or preserved lemons, or an invitation to pick olives that will turn into treats for months.

So if the mood takes you take your nostalgia, scientific discovery, gluttony and super fairy powers into the kitchen, clear some time and space and enjoy making yourself or someone you like something delicious.


Artichokes…do you eat them, know what to do with them? I love the little artichoke hearts you get from the deli, on their own as part of a mezze plate or on pizza with ham, olives and mushrooms.

My stepmother introduced me to eating artichokes whole, as a meal in their own right. She’s English and was a food editor so has the most wonderful palate for appreciating good food, nicely prepared but not overly complicated. I remember her cooking them until they were tender and then teaching me to peel the leaves off one by one, dipping in whole egg mayonnaise (S&W brand from memory), and scraping the flesh off with my teeth.

It was a delicious meal you had to work for a little, but totally worth the effort, like a meal of spaghetti vongole, the sweet little pippis that we used to dig up with our toes with my dad at dusk on the waters edge of the beach at Dunbogan.

When I received these lovely artichokes in my produce box I hadn’t quite decided what to do with them, but thought it might be nice to preserve them and then have them on hand for pizza night, which we do every fortnight or so. I’d say more often during these recent Covid times of carbo-loading, which seems to keep us a little happier (and rounder).

So I found a recipe online by Hank Shaw https://honest-food.net/pickled-artichokes-recipe/

and adjusted accordingly as I had less artichokes (I used half his amount of pickling liquid as I had 3 large artichokes and about 4 tiny ones), but I pretty much followed the process he uses. You can find additional information in the artichoke section outlined in Stephanie Alexanders Cook’s Companion.

The important part is to have a bowl of lemon juice and water ready before you start chopping and peeling, as they oxidise/brown immediately.

Anyway, they are really delicious, with a nice crunch to them, you could certainly cook them longer if you like them softer, but to me they are perfect as is.

This crispy pork mince stir fry is very loosely based on the Thai dish Pad Kra Pao, but now I have kids I tone it down a bit. I’m not cooking multiple meals if I don’t have to! They love this one…so delicious…

1 tablespoon vegetable oil (you can use less if you like)

6 cloves garlic, chopped

1/2-1 large red chilli (or more if you want it more authentic)

500g pork mince

1 packet silken tofu 250g ish

1-2 tablespoons fish sauce

2-3 tablespoons kecap manis

1/2 green Savoy cabbage, sliced (use any veg, wombok is great, red capsicum etc)

Fresh lime juice or lemon juice

1 bunch Thai basil, or coriander, to serve

Fried egg, jasmine rice, crispy chilli sauce to serve, optional


Heat a wok until very hot, add vegetable oil, swirl to coat, add garlic and chilli (these days it is only 1/2-1…it used to be 2-3) and stir for a few seconds only as it will burn quickly, then add pork mince all at once. I use 500g and it feeds 4 of us plus some leftover for lunch the next day. Stir a little to avoid sticking then leave it to brown a bit. Then break up with a wooden spoon. I like a flat-edged one, it is better for scraping. It needs to be hot enough so it doesn’t stew…it should be on the hottest burner.

If you can, get pork mince with some fat in it, from a butcher, it will taste much better and cook better too. Beware supermarket mince that looks like worms, I always find that turns out dry.

While mince is cooking bring a small saucepan of water to the boil, add 1/2 teaspoon salt and use a large spoon to slide tofu into water. Careful not to splash yourself. Turn off heat and leave to warm through while mince cooks.

Once the mince has lost its pink colour, add fish sauce, stir until it evaporates, then add kecap manis and cook until deeply golden brown. If it goes extra crispy that is extra delicious. Add cabbage or whatever veg you have on hand and stir through until just starting to soften but still green and a bit crisp. If you have a lot of veg you can put a lid on and let it steam for 30 seconds to a minute. If you add a lot of veg you’ll probably need to add extra fish sauce and kecap manis. 

Remove tofu from water with a slotted spoon to a bowl or the wok.

Taste, check seasoning, add lime or lemon and adjust salt/fish sauce/kecap manis as desired. Plunge herbs in a bowl of water to clean thoroughly, then shake off and roughly chop, stir through stir fry at last minute off the heat. Serve with jasmine rice and silken tofu.


We just had a beautiful weekend at our friends’ property in Fosterton NSW, about 3 hours north of Sydney. The last time we visited they cooked for us, so it was time for us to return the favour.

Here’s the menu, I cooked the spanakopita and osso buco, D cooked the pancakes, crumpets and nasi goreng. He’s a keeper.

Friday night- Spanakopita (which is a meal in its own right but…a long drive and ravenous children mean the addition of pork and ginger sausages from Feather and Bone https://featherandbone.com.au/

Saturday morning- Sourdough ricotta pancakes served with extra ricotta, lemon curd and maple syrup

Sat lunch- Nasi goreng with prawns and bok choy

D usually makes it with lap cheung (Chinese sausage…delicious!) but I forgot to pack it so we used the leftover sausages from the night before

Sat night- Osso buco, broccoli, crisp rosemary and garlic potato chips

I cooked 3 times what I normally would so we’d have enough for all 8 of us plus leftovers for lunch the next day, we still had a bit extra so the scraps went in the freezer for puppy treats for next time.

It was interesting trying out the gas oven. Hagar had made rugelach last time and noticed it took a while to bake so I allowed extra time (I started making dinner at 2pm) and had plenty of time to leisurely get dinner on and then left it to do its thing. The potatoes would normally take an hour, but took 2 hours to really crisp up. It will take me some time to figure out this new oven but it did make really nicely crisp potato chips!

Sun am- Sourdough crumpets with butter and local honey

We were fighting over them at the end, and D had made 22! Everbody adored them, they were so moreish.

Sun lunch- leftover spanakopita and osso buco plus a nice salad by Hagar (queen of salads) of all the crisp veg in the fridge plus feta

After all that food we needed a big walk so we took a stroll down to a neighbours farm and (with permission of course) the kids played on the hay bales. It’s pretty fun taking a running leap up onto a hay bale.

Ever fearful of running out of food (as if we could have!!) I had brought with me a tray of nutella brownies and a tray of lemon slice just in case anyone was hungry! The brownies got demolished by the kids, cramming them into their little mouths with gusto. I prefer the sweet tartness of the lemon bars…so I’m happy to have some leftover 🙂


Chewy on the outside, tender in the middle. These delicious friands are best served warm straight out of the oven, but will keep for several days…

Ingredients

180g salted butter, plus extra to grease

6 egg whites

240g pure icing sugar, sifted

120g almond meal (finely ground almonds)

75g plain flour

1 teaspoon finely grated lemon zest 

80g lemon curd

Method

  1. Preheat oven to 200C (not fan forced). if you only have fan-forced as an option, set it to 180C fan forced)
  2. Melt butter in a small saucepan, you can let it go a little bit brown, it will add a nice nutty flavour. Don’t let it burn though.
  3. In a large bowl add egg whites and stir in sugar. Add melted butter in a thin stream whisking as you mix. Add almond meal, flour and lemon zest.
  4.  Grease a 12 hole friand tin (oval shaped), or muffin tin with extra melted butter and divide mixture evenly between holes. Mixture will be runny. Drop one teaspoon lemon curd into the centre of each friand.
  5.  Bake for 25 minutes, friands will be deeply golden. Use a butter knife of palette knife to run around the edge of each friand and remove gently to a cooling rack. Serve warm.

Tips

  • Icing sugar goes hard over time, buy fresh icing sugar to make sieving easy. Or give yourself extra time to sieve old lumpy icing sugar!
  • Almond meal goes rancid over time so store in the fridge or freezer and use within the best before date

References

I have been making these for years, but think I got the original quantities from the Australian Women’s Weekly website. 

The only thing my hands want to work on right now is this gorgeous kid mohair, silk and merino blend by Rosabella Yarn https://rosabellathreads.com.au/. I think it’s the combination of colour-play, texture and fun, inspired by one of my favourite knitwear designers, Stephen West, American born but now based in Amsterdam https://www.westknits.com/. His patterns are written very clearly and are always an enjoyable knit with a few interesting but simple techniques. This one is called Fantastitch and the fun comes from the colour play and the variation of pattern. It never gets boring!

The Rosabella fine kid fibre is grown, scoured and milled near Toowoomba in QLD, Australia. There aren’t many mills left in Australia so I like to support them whenever I can. The hand-dyed colours add a beautiful tonality that is more complex than a large scale commercially dyed wool.

I have only tried the Prima base so far, but am slightly addicted to its soft lustre and luscious hand-feel. The remainder of last years clip has been sent out to just a handful of yarn stores and I got mine from my friend Tash who owns https://handmakecreate.com.au/ and loves to support local producers.

I have spent the last 3 years helping other people pick colours for their projects, so it takes a special person to do the same for me. It’s like someone offering to make you a cup of tea…delightful!

These are *supposed* to be of equal size.Dave here. I’m doing some guest content on Tina’s blog to give her a kick into updating it herself.

Mister Seven’s standard breakfast order these days is “flatbread with cream cheese” – or, in the last couple of days, “flatbread with nothing on it,” because I guess he’s too good for cream cheese now? – and we’re almost out of pita breads from the shop, so today I decided to try my hand at making them.

The recipe here is from Chef John via Binging with Babish, and I didn’t change anything other than almost forgetting to add the salt, but the key question is whether they can be frozen and cooked later. A quick search suggests freezing the dough in balls after the first rise, then defrosting for 2-3 hours when needed and rolling them out – but that seems like a solution for a different problem than I have, which is how to make breakfast when I woke up ten minutes ago and the coffee machine is still warming up.

So here’s the experiment we’re doing: I’ve rolled out eight pitas (pitæ?), cooked one as a control (everyone approved, especially Mister Seven), and put the remaining ones in the freezer between sheets of baking paper. Tomorrow I’m pulling one straight out of the freezer and into the frying pan, no 2-3 hours of nothing.

Stay tuned.


Next day update

Freezing them turned out pretty well. Not quite as good as the fresh one, but it did puff up a bit after flipping a few times, and Mister Seven was happy with his breakfast. I put some Vegemite in a second one to throw into school lunches – this one didn’t puff up enough to have that pita pocket, but it was easy enough to tease apart with a knife.


Final update

So… satisfying…

The hunt for the ideal hot cross bun continues. I still miss my favourites from Davelle’s bakery in Epping, but I’ve moved house so it’s too far even for me to make the trip just for buns

I decided to have another crack at making them this Easter, and thought I’d try the Laucke sweet bun packet mix. It is a sweet bun packet mix so didn’t include the cross, which is fine as I find it is often a bit tough. I didn’t have very high expectations for the mix given the long list of ingredients on the label, but have tweaked it mostly in terms of method but added a few ingredients too:

1. I added 2 teaspoons of home ground mixed spice which I had on hand and added it to the flour.

2. I soaked 1 1/2 cups of dried fruit (currants, sultanas and a little mixed peel). It’s important to soak your fruit or it’ll make the buns dry as they soak up any liquid in the dough. Cover with boiling water and soak for a few hours or soak in cold water overnight. Drain.

N.B. As an alternative you could use cranberries or use choc chips.

Method

1. Add yeast to warm water to make sure it’s still active (it should start to froth up in 5-10 minutes). Add flour mix and spice to an electric mixer bowl with the paddle attachment, add the yeast liquid and mix on low speed until a dough forms. Swap to the dough hook and knead on medium speed for 8 minutes or until a small piece of dough stretched out forms a thin layer and doesn’t just break apart. This let’s you know the gluten has started to develop and this gives the bread its structure.

2. Transfer dough to an oiled bowl, turn over in the oil and cover with oiled clingwrap. Place in fridge for 6 hours (or as long as you have, overnight would be fine). This retards the growth and develops flavour. The dough almost doubled in volume.

3. Dust a chopping board with flour, remove dough from bowl and  press out into an oblong like an A4 sheet of paper in portait. Lay drained soaked fruit on top and press in gently (it won’t go in much that’s ok). Roll up towards you starting at the furthest edge making small firm pressing turns to help enclose the fruit within the dough. Once rolled up, turn the log seam-side up and press out gently as before into portrait. Repeat the rolling again until the dough starts to stretch over the fruit and some of the fruit starts to pop out. Return dough to oiled bowl, cover and leave to rest for 10 minutes.

4. Cut dough into 8 pieces (this made quite large buns, you could easily make 10-12 buns) and shape into balls. Use flour as this is a bit messy. Try to enclose the fruit within the dough. Place buns on a baking paper lined tray with a little space between them as they will expand. Place tray inside a large clean plastic bag (like a small clean garbage bag), trap some air in there so the plastic doesn’t touch the buns and tuck ends under or tie up. Place on the stove top or another warm place. Place a pizza stone on the bottom level of the oven and preheat to 250C fan forced.

5. For the next 45 mins to 1 hour let buns double in volume inside the bag and oven should get really hot.

6. Remove tray of buns from bag and place in oven on the pizza stone, close door quickly. Reduce oven temperature to 200C fan forced. Quickly open the oven door and throw one cup of ice or 1/2 cup water onto the bottom of the oven underneath the tray of buns and quickly close the door. This creates steam in the oven which produces a nice crust and browning. Bake for 15-20 minutes until deeply golden.

7. While buns are baking make a glaze with 2 tablespoons white sugar, 1/3 cup water and a pinch of cinnamon. Bring to the boil in a saucepan, stir until sugar is dissolved then simmer for 5 minutes until slightly thickened. Brush warm glaze onto freshly baked buns. Allow buns to cool before cutting. They will be a little doughy straight out of the oven but are fine after cooling.